
Your Blogger website needs to be fast. Period. If your pages take more than three seconds to load, you’re basically telling visitors to hit the back button and never return. Speed isn’t just a nice-to-have feature; it’s essential. It affects your SEO, user experience, and ultimately, the success of your blog.
But how do you actually speed up your Blogger site? It comes down to making smart choices about themes, images, scripts, and overall site structure.
Below, you’ll find a concrete, practical guide that covers everything you need to know to optimize your Blogger website’s speed and performance.
Why Page Speed Matters (and Why You Should Care)
Imagine inviting someone to your house, and they’re stuck waiting outside while you finish tidying up. Awkward, right? That’s basically what a slow website feels like. Visitors expect your site to be ready when they arrive.
Google doesn’t take kindly to slow websites either. It’s an official ranking factor, meaning that if your pages take too long to load, your site’s visibility suffers. Not to mention, users are more likely to bounce if they don’t see something load within a few seconds.
Here’s the deal: Faster pages mean happier users and better SEO. Let’s make that happen.
How to Check Your Page Speed
Before making improvements, figure out how bad the problem actually is. Use these two tried-and-true tools:
1. Google PageSpeed Insights
- Enter your website URL and click “Analyze.”
- Get a detailed report on both mobile and desktop performance.
- It tells you which areas need attention, like unoptimized images or slow server response times.
2. Site Audit From Different Tools
- Conducts an in-depth analysis of your entire site.
- Flags slow pages and point out the exact reasons for their sluggishness.
- Offers solutions to fix performance issues, like unminified JavaScript or heavy images.
Once you know where your site stands, it’s time to tackle the problem areas.
Speed Optimization Tips for Blogger Sites
1. Choose Speed-Friendly Themes
Let’s be real—Blogger’s default themes might seem boring, but they’re built to be fast. They’re lean, lightweight, and designed to work smoothly without all the unnecessary frills.
If you’re using a custom theme because it looks cooler or more “professional,” just know that every extra widget, script, and fancy animation could be slowing your site down.
Why Default Themes Are Faster
Default themes come optimized straight out of the box. They’re less likely to include bulky, third-party scripts and unnecessary CSS files that make your site feel like it’s running through wet cement.
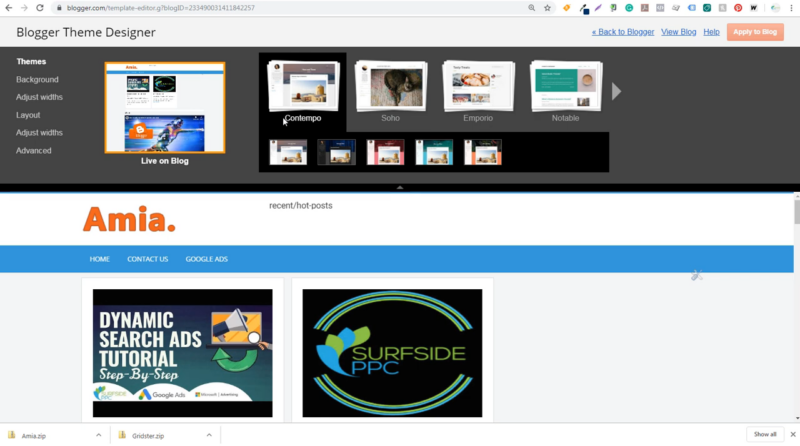
How to Switch to a Speed-Friendly Theme
- Go to your Blogger dashboard.
- Click on Theme from the left-hand menu.
- Choose one of the Blogger default themes like Simple or Contempo.
- Preview and Apply.
Pro Tip: If you absolutely must use a custom theme, opt for one labeled as “lightweight” or “fast loading.” Themes without too many animations or visual effects are usually a safe bet. Example: Imagine your website as a sports car. Default themes are like taking off all the unnecessary roof racks and spoilers that weigh you down. Custom themes, on the other hand, are like strapping a trailer to your car—sure, it might look impressive, but your speed suffers.
2. Limit Widgets and Gadgets
View this post on Instagram
Widgets are like candy—tempting, colorful, but too many will make you sluggish. The more widgets you have, the more HTTP requests your site makes. Every single widget adds files and scripts that the browser needs to download, increasing the page load time.
Which Widgets Are Essential
- Search Bar: Makes navigation easier.
- Recent Posts: Gives readers quick access to your latest content.
- Subscription Box: Helps build your mailing list.
Which Widgets to Ditch
- Social Media Feeds: Just link to your profiles instead.
- Visitor Counters: Nobody really cares.
- Flashy Animations: They look cool but kill speed.
How to Remove Unnecessary Widgets
- Go to Layout in your Blogger dashboard.
- Find the widget you want to remove and click Edit.
- Hit Remove and Save.
3. Reduce Posts on the Homepage

Have your entire catalog of posts loaded on the homepage? Big mistake. This slows down your load time drastically.
Think of it as serving a seven-course meal all at once. Instead, serve just a sample and invite them to explore the rest.
How Many Posts to Show
- Keep it between 5 to 7 posts on the homepage.
- Add a Jump Break in each post, so only the introduction appears on the main page.
How to Set Post Limit on Homepage
- Go to Settings -> Posts.
- Set the number of posts to display to 5 or 7.
- Click Save.
4. Optimize and Compress Images
Uploading high-resolution images straight from your camera is like serving an entire loaf of bread when a slice will do.
Why Image Optimization Matters
Uncompressed images are huge in file size, which means they take ages to load. Compressed images are smaller, quicker, and don’t compromise much on quality.
Image Formats to Use
- JPEG: Best for photos and realistic images.
- PNG: Good for graphics and transparent backgrounds.
- WebP: Even smaller than JPEG and PNG, but not universally supported.
- GIF: Avoid unless absolutely necessary (like animations).
How to Compress Images
- Use tools like TinyPNG, ImageOptim, or Kraken.io.
- Reduce the image size to exactly what you need—no bigger.
- Keep the quality setting around 70-80% for a balance of clarity and speed.
5. Minify JavaScript, CSS, and HTML
Enhance Website Speed & Performance
🔺Compress images and enable browser caching.
🔺Use a CDN (Content Delivery Network).
🔺Optimize code by minifying CSS, JavaScript, and HTML.— Jay Gangwar (@JayGangwar07) March 14, 2025
Messy code is like clutter in your room—it slows everything down. Minifying your code means stripping out all the unnecessary spaces, line breaks, and comments that bulk up your files.
Why Minification Matters
Minified files load faster because they are smaller and easier for the browser to read.
Tools to Use
- Minifier.org for CSS and JavaScript.
- HTML Compressor for HTML files.
Example of Unminified vs. Minified CSS
Before Minification
CSS:
body { font: 36px Arial, sans-serif; } #container { color: white; background: #ffbd17; }
After Minification
CSS:
body{font:36px Arial,sans-serif}#container{color:#fff;background:#ffbd17}
6. Eliminate Render-Blocking Resources

These are usually CSS and JavaScript files that hold up the rendering of your page, making it load slower than molasses in January. The key here is to prioritize what loads first and what can wait a little.
Why Render-Blocking Resources Are a Problem
When your browser encounters a render-blocking file, it has to fully download and process it before moving on to the rest of the content. This delay means users are left staring at a blank page—or worse, half-loaded content.
How to Fix It
- Inline Critical CSS: Put the most important styles directly in the HTML, rather than loading them from an external file. This makes essential visuals appear quicker.
- Defer Non-Essential JavaScript: Add the defer attribute to your script tags, telling the browser to load them only after the HTML content is fully parsed.
- Use Asynchronous Loading: The async attribute lets scripts load in the background without holding up page rendering.
Instead of this
<script src=”script.js”></script>
Do this
<script src=”script.js” async></script>
Or even better
<script src=”script.js” defer></script>
7. Use Browser-Friendly Fonts
@lisasystudio Top 5 Google fonts — all free with an open license to use in your next project! #graphicdesign #design #fonts #googlefonts #bestgooglefonts #madewithfonts #typography #howtodesign #designforbeginners ♬ pink white frank ocean cover by remi wolf – remiwolf
Let’s be honest—custom fonts look snazzy. But they can also be total speed demons. Fancy typefaces often come from external sources like Google Fonts or Adobe Typekit, which means extra HTTP requests and longer load times.
Why Browser-Friendly Fonts Are Faster
Fonts like Arial, Verdana, and Tahoma are considered web-safe because they’re pre-installed on most devices. Since they don’t need to be fetched from a server, they load almost instantly.
How to Implement Web-Safe Fonts
- Stick to System Fonts: These fonts are already present on your users’ devices.
- Host Fonts Locally: Instead of fetching fonts from third-party sources, download and serve them from your own server.
- Limit Font Variants: Use only the weights and styles you need. No need to load bold, italic, and light variants if you’re only using regular and bold.
For example, instead of using a custom font that loads externally, use something like:
body {
font-family: Arial, sans-serif;
}
Avoid custom fonts unless they’re absolutely essential to your brand. And if you must use them, load them locally rather than through external servers.
8. Reduce HTTP Requests
Imagine you’re at a restaurant and your server brings your meal one ingredient at a time—bun, patty, lettuce, tomato, cheese. You’d be pretty annoyed, right?
That’s basically what HTTP requests do when your site loads one file after another. The more requests, the slower your site.
Why Fewer Requests Matter
Every single file—whether it’s a script, image, CSS file, or font—makes a separate request to the server. Reduce the number of requests, and your site loads faster.
How to Reduce HTTP Requests
- Combine CSS Files: Merge multiple stylesheets into one to minimize calls to the server.
- Merge JavaScript Files: Consolidate your scripts to avoid redundant loading.
- Use CSS Sprites: Combine multiple images into a single file to reduce separate image requests.
- Eliminate Redundant Plugins: Some plugins generate additional HTTP requests, so make sure you really need them.
Instead of linking multiple CSS files like this:
<link rel=”stylesheet” href=”style1.css”> <link rel=”stylesheet” href=”style2.css”>
Combine them into one:
<link rel=”stylesheet” href=”combined.css”>
9. Compress Your Theme Files
Your theme files are like your closet—over time, they get cluttered with stuff you don’t really need. Uncompressed files are bulky, slow to load, and can take up valuable bandwidth.
Compressing them not only reduces file size but also speeds up the loading process.
Why Compressing Matters
Compressed files download faster because they take up less space. Think of it like vacuum-sealing your clothes before packing—they still exist, just in a much more compact form.
How to Compress Your Theme Files
- Use Gzip Compression: Gzip reduces file sizes by up to 70%, making them faster to download.
- Leverage Browser Caching: Cache compressed files so returning visitors load your site even quicker.
- Minify Your Code: Minifying CSS, JavaScript, and HTML before compression further reduces file size.
To enable Gzip compression, add the following to your .htaccess file:
<IfModule mod_deflate.c>
AddOutputFilterByType DEFLATE text/html text/plain text/xml text/css text/javascript application/javascript application/json
</IfModule>
10. Reduce Redirects
Redirects are like detours on your road trip—they might eventually get you where you’re going, but they add unnecessary travel time. The more redirects you have, the longer it takes for your content to appear.
Why Redirects Are a Problem
Every time a redirect occurs, your site essentially loads twice—once for the initial URL and again for the redirected one. Multiply that by a few pages, and you’re looking at some serious delay.
Common Redirect Mistakes
- Redirect Chains: A redirects to B, which redirects to C. Streamline that!
- Temporary Redirects (302): Use permanent redirects (301) whenever possible to save processing time.
- Unnecessary Redirects: If you’re redirecting an old URL to a new one, make sure it’s necessary.
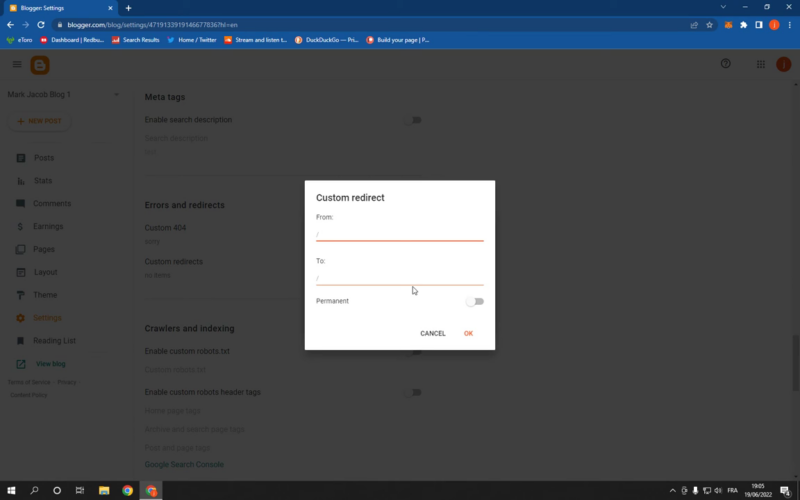
To set up a proper redirect, add this to your .htaccess file:
- Redirect 301 /old-page https://www.yoursite.com/new-page
Final Thoughts
Speed optimization for your Blogger site doesn’t have to be rocket science. It’s all about making smart, practical choices—whether it’s choosing the right theme, compressing your files, or eliminating unnecessary redirects.
Follow these ten steps, and you’ll turn your sluggish site into a speed demon, delivering a smooth and snappy experience for your visitors.
Take the time to implement these changes one by one, and keep testing your performance with tools like Google PageSpeed Insights and Site Audit. Once your site is running like a well-oiled machine, you’ll notice happier visitors, improved SEO, and a much more satisfying blogging experience.